
How do I check my tracking tags work with Tag Assistant?
Open tagassistant.google.com, select Add domain, enter your site address and select Connect. Your site opens in debug mode, and Tag Assistant lists which Google tags fired on each page. Submit your form and tap your phone number, then confirm the matching events in Tag Assistant and in Google Analytics DebugView.
The short version
- Go to tagassistant.google.com, select Add domain, enter your address and select Connect.
- Click around the site in the window that opens. Submit your form and tap your phone number.
- In Tag Assistant, check your Google tag fired on every page, and your lead events fired when they should.
- In Google Analytics, open Admin, then DebugView, to see the same events arrive.
- Do this after any change to the site, theme, form plugin or consent banner.
How do I check my tags?
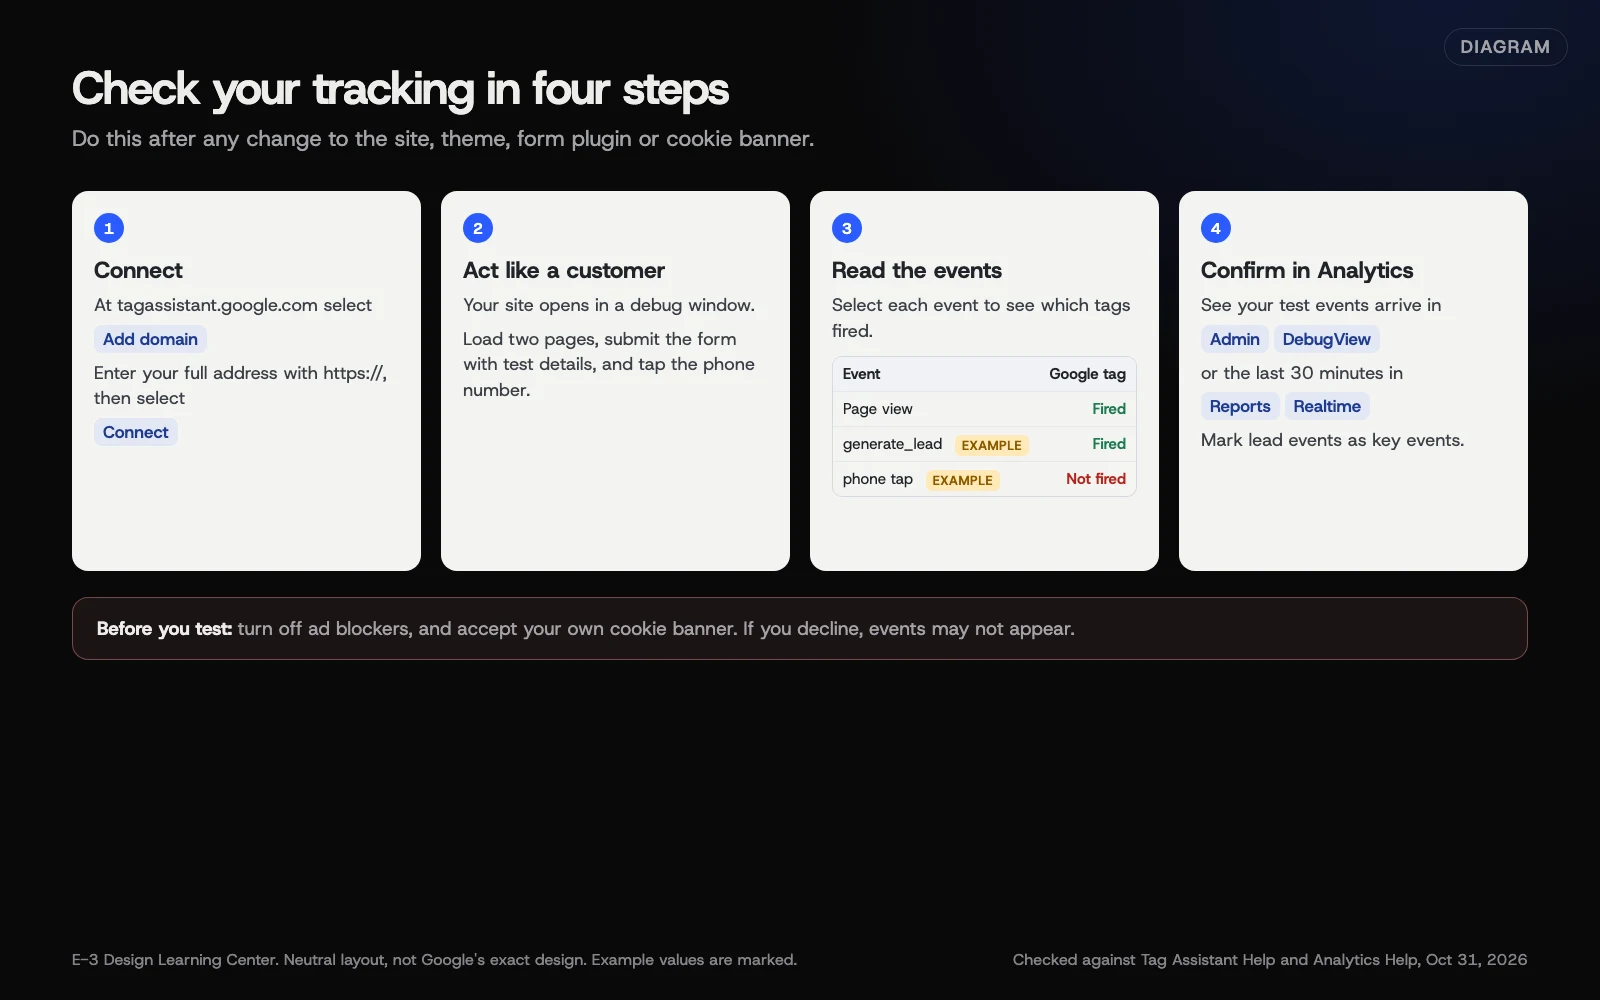 Diagram: checking tags with Tag Assistant, then confirming the events in Google Analytics. Based on Tag Assistant Help and Analytics Help (October 2026). Example events are marked.
Step 1: Connect Tag Assistant
From Google’s Tag Assistant Help:
- Go to tagassistant.google.com and sign in with your Google Account.
- Select Add domain.
- Enter your site’s full address, including https://.
- Select Connect.
Your site opens in a new window with a _dbg parameter added to the address. Keep both windows open.
Google recommends the Tag Assistant Chrome extension. It isn’t strictly required, but you need it for tags inside iframes and for pop-ups or new tabs.
Step 2: Do what a customer does
In the site window:
- Load the homepage, then a service page.
- Fill in and submit your contact form with test details. Use your own name and say it’s a test.
- Also try a failed submission, such as leaving a required field empty. Your lead event should fire only for the successful one.
- If you have a cookie banner, run the test once accepting and once declining, so you know what each choice sends.
- Tap or click your phone number.
- Click a booking button or email link if you track those.
Step 3: Read the results
Back in Tag Assistant, each action you took appears as an event in the left column. Select one to see which tags fired and which didn’t.
- Your Google tag (the one with your Analytics measurement ID, starting G-) should fire on every page.
- Your lead events should appear when you submitted the form or tapped the number. The name depends on how they were set up, such as generate_lead or a custom name.
- If an event was sent but no matching tag fired, Tag Assistant warns you.
Step 4: Confirm in Google Analytics
Two Analytics reports help:
- DebugView: Google’s DebugView page says it’s under Admin, then DebugView. Tag Assistant turns on debug mode for your browser, so your test events show up there as they happen.
- Realtime: Reports, then Realtime, shows activity from the last 30 minutes, including key events, per Google’s Realtime page.
Check your lead event is marked as a key event, or it won’t count as a lead in your reports. Our Analytics guide shows how to set up key events.
Why does it matter?
Tracking breaks quietly. A new form plugin, a theme update, a page builder change or a new cookie banner can stop the tag firing, and Analytics simply shows fewer leads. Owners then make decisions on numbers that are wrong. A ten-minute check after each change catches it. Our answer on how to know if your site brings in calls and leads explains why lead events matter.
What are the common mistakes?
- Testing with an ad blocker or privacy extension on. It can block the tags you’re testing.
- Declining your own cookie banner. If consent mode is in place and you decline, Google’s DebugView page notes events won’t appear. Accept, or test both choices on purpose.
- Two Google tags on one page, often one from a plugin and one pasted in by hand. The same event can be sent twice.
- The form shows a thank-you message but the event doesn’t fire, because it was set up for an old thank-you page.
- Forgetting to delete or label test leads in your form plugin and CRM.
What if this didn’t work?
- Tag Assistant won’t connect: check you typed the exact address, with https://. Try the Chrome extension, and turn off other extensions.
- No Google tag found: the tag may be missing, but a declined cookie banner, an ad blocker or a lost connection to Tag Assistant can also hide it. Accept consent, turn off blockers, reconnect and try again. If it’s still missing, check your theme, plugin or Tag Manager container is published.
- The tag fires but no events show in Analytics: check you’re looking at the right property, and that consent was given in your test.
- Events fire twice: look for a second copy of the tag.
- You use Google Tag Manager: use its Preview mode, which opens Tag Assistant for you. See whether you need Tag Manager at all.
- The tag was never added: see how to add GA4 to your website.
If the fix means editing theme code or Tag Manager, and you don’t do that yourself, send the Tag Assistant results to whoever manages the site. You can share or export a debug session from Tag Assistant. Before you do, check it for personal details, such as names or emails from your test form and page addresses with private information in them. Never include passwords or sign-in links.
How much does it cost, and how long does it take?
Tag Assistant and Analytics are free. A full check takes about ten minutes.
How does E-3 handle this?
Accounts E-3 sets up, including Analytics, are created in the client’s name with E-3 added as a user. Lead tracking is part of our SEO and AI search service, and site changes are tested on a staging copy first.
Related questions
Next step
- Next: Something looks wrong with my website: which free tool?The next guide in Free tools roundup.
- Free website checkPublic checks on your own site, then an action plan of what to fix first.
Still stuck? Ask E-3 for an answer from our help guides.
Rather we handled free tools roundup for you?
It’s part of what we do every week for small businesses, as part of seo and ai search. Start with a free check of your site and profile, or call and ask.